· Chris Hammond
Last Updated
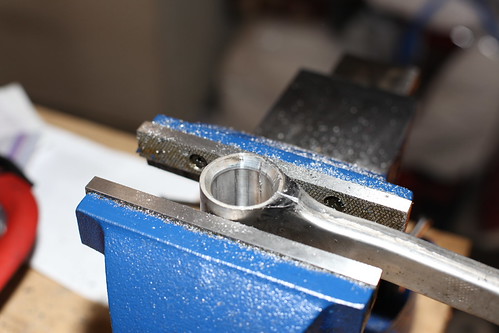
Success! The bushings are removed from the upper arms
Explore this blog post about the importance of having the right tools, using a home repair task as an example. See images and video of the process.
Well, it just goes to show you. Having the right tool for a job is the key to getting the job done right.
Last night I spent some time trying to get the bushings out again, I didn’t have any luck. I then ran to Home Depot and picked up a 6” vise.
Tonight I mounted the vise to my workbench and got to work. It didn’t take long, with the vise in place I was able to knock out the first bushing. The 2nd and 3rd took a little work, but were much easier than the first one.
The 4th one was a breeze, though I think it was too easy for a reason. I may have cut a little too deep into the control arm bah! I may have to go ahead and order another OEM replacement arm just to be safe. Fortunately, the cut doesn’t go across the whole arm, but we’ll see. I would hate to think what could happen if that arm broke while I was driving down the highway.
Here’s a shot of the arm sans bushing, the cut is on the inside (far side):
and here’s the removed bushings (sans some of the burned out rubber):

and here’s a video of the process over the past two days: